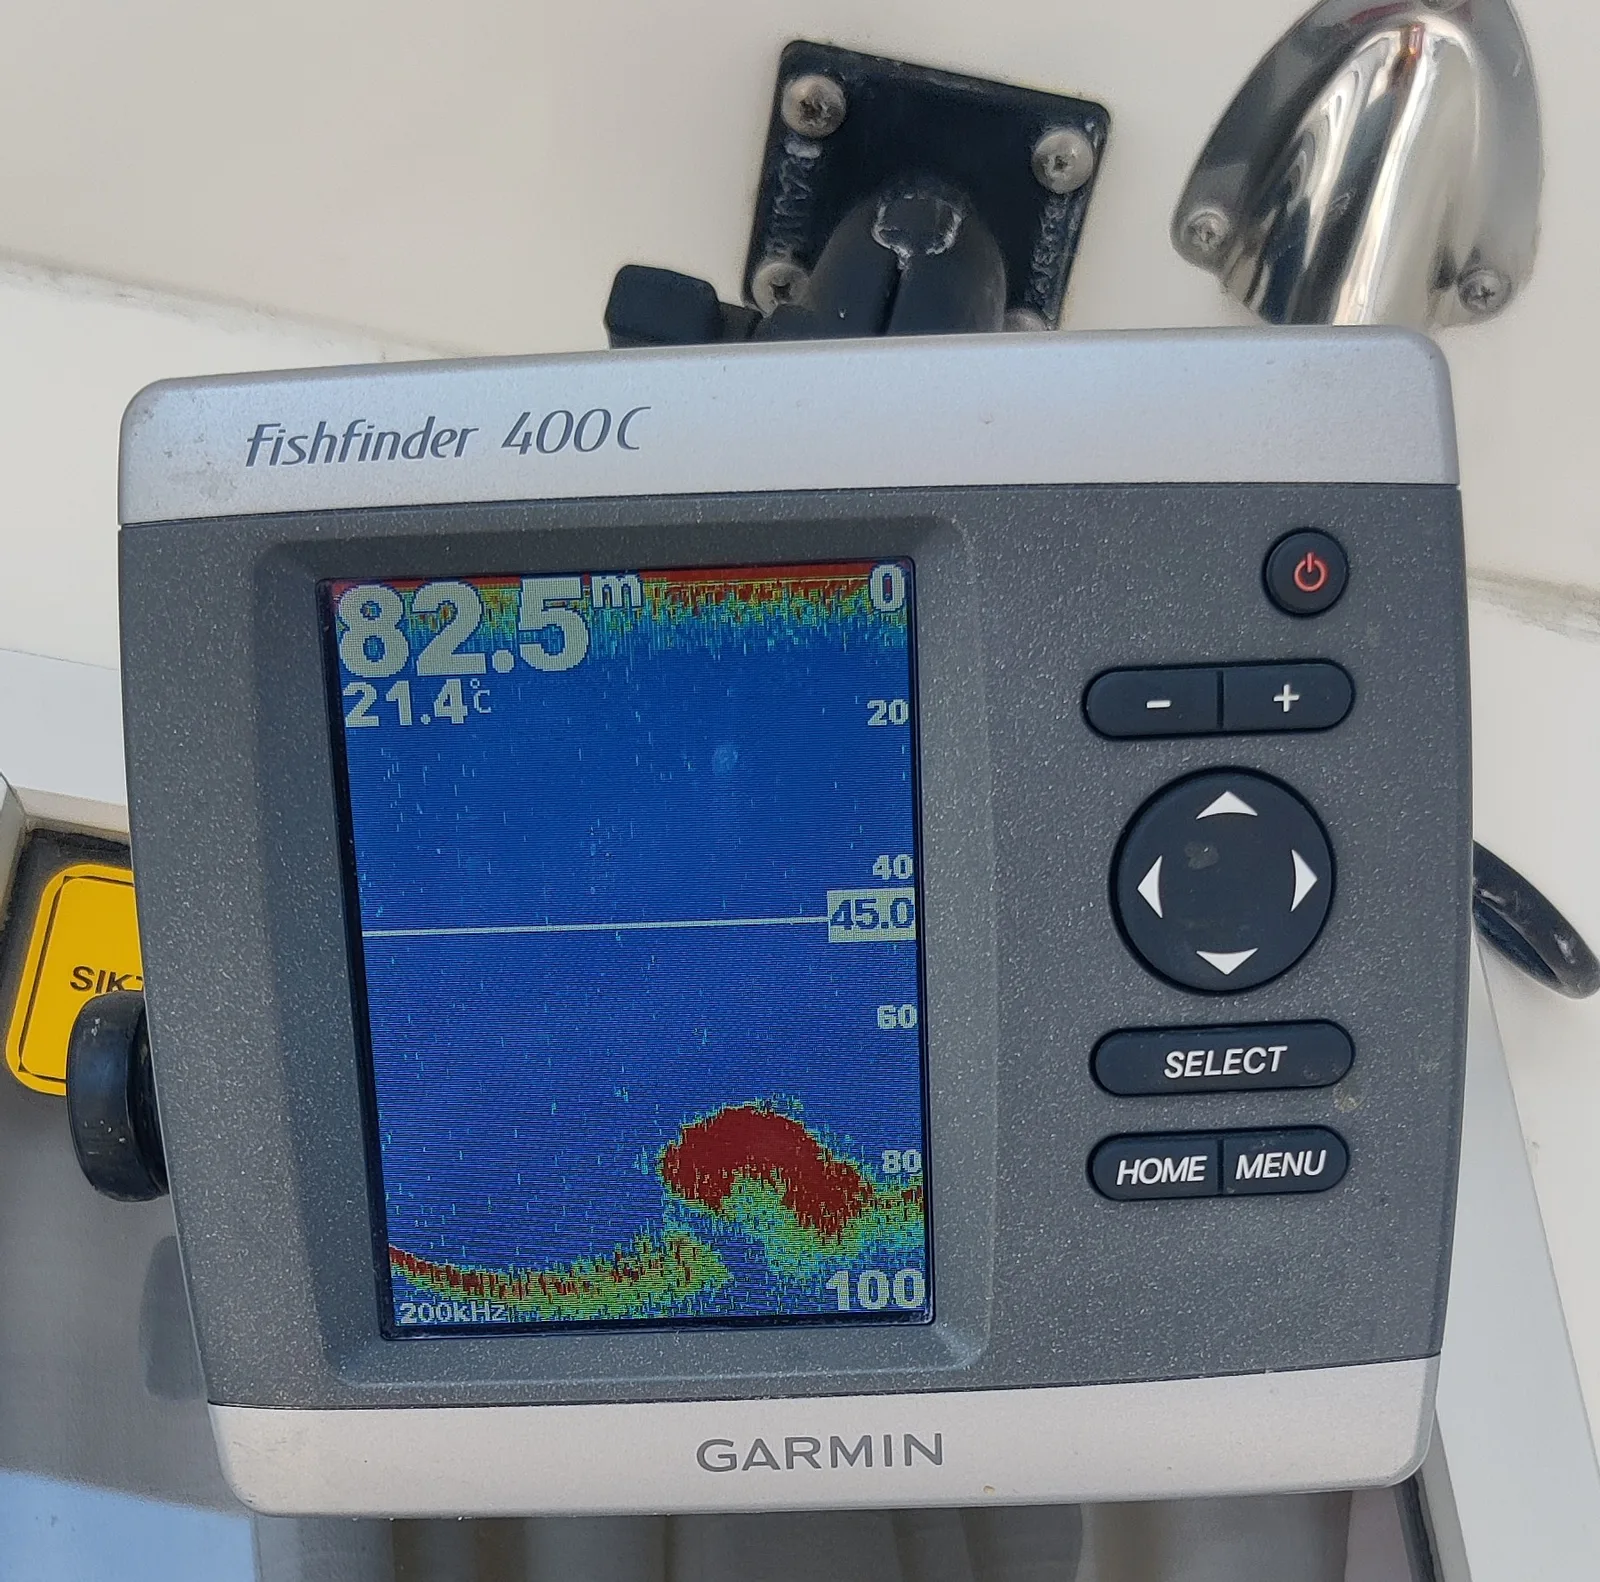
To read a fish finder, remember one thing about the screen: it is not a picture of what is under the boat now. It is a history. The transducer sends a pulse of sound down in a cone, listens for the echo, and draws what it heard as one thin column at the right-hand edge; the columns scroll left as new ones arrive. So a fish that sits still under an anchored boat draws a flat line, a fish that swims through the cone as the boat moves draws an arch, and a rock ledge draws a step.
The screen is not a window. It is a strip chart of the last minute, and every mark on it is a sound that came back.
What do the marks mean on 2D sonar?
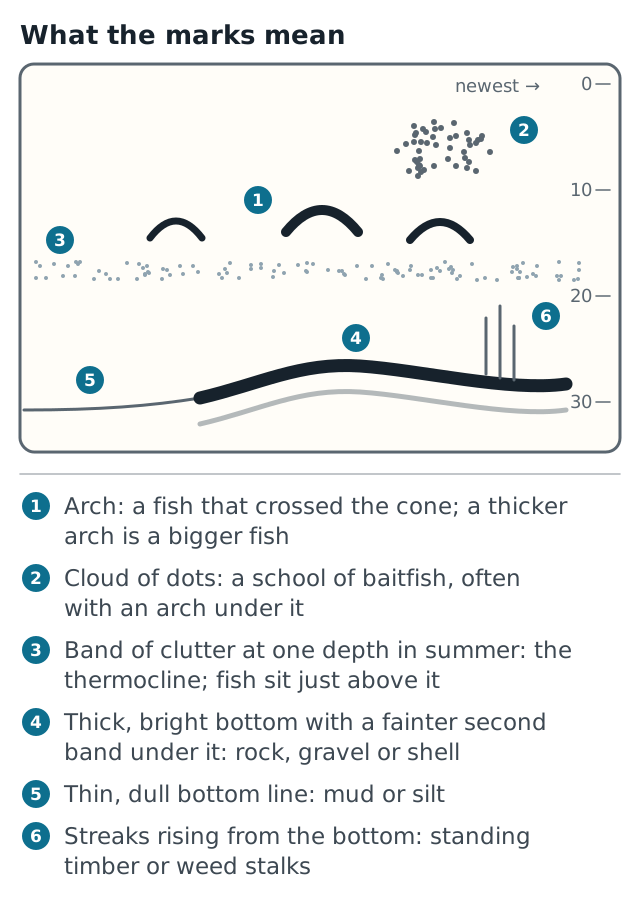
A 2D sonar screen with the six marks from the table. Drawing: fishing.info.
| What you see | What it is | What to do |
|---|---|---|
| A clean arch, thick in the middle | A fish that crossed the whole cone under the boat; the arch grows as it enters the cone, peaks when it is closest and fades as it leaves | Bigger, thicker arches are bigger fish; a long arch at trolling speed is a fish that swam with the boat |
| A half arch or a slash | A fish that clipped the edge of the cone, or one that moved while in it | Still a fish; the cone missed most of it |
| A flat line at mid-depth over an anchored boat | A fish holding still under you | Drop a bait to it |
| A cloud or ball of dots, often with arches around or under it | A school of baitfish, and the predators on it | Fish the edges and the bottom of the school |
| A thick, bright bottom band with a second, fainter band under it | Hard bottom: rock, gravel, shell; the strong echo bounces twice | Structure fish hold on; note the spot |
| A thin, dull bottom line with no second echo | Soft bottom: mud, silt | Catfish and carp water; bass and walleye pass through |
| A band of clutter across the screen at one depth in summer | The thermocline, where warm surface water meets cold deep water and the density change reflects sound | Fish sit just above it in summer; set the bait there |
| Vertical streaks or a line rising from the bottom | Standing timber, weed stalks, a bridge piling | Cover; fish are inside it |
| Scattered dots near the surface | Small bait, plankton, or air bubbles from the prop | Ignore, or lower the sensitivity |
| A ragged, broken bottom line at speed | The transducer losing the bottom from turbulence | Slow down or re-angle the transducer |
The arch is the part beginners doubt, and it is only geometry. The cone is wide at the bottom and narrow at the top. A fish enters it at the edge, far from the transducer, so the echo is weak and the depth reads deeper. It passes under the boat, close and strong, and leaves at the far edge, weak again. Drawn column by column, that is an arch.
The arch is also the reason to switch the fish symbols off. Garmin’s manual describes that setting as drawing “suspended targets” as symbols, and a suspended target is anything between surface and bottom that echoed. The raw arch says more: thickness is the strength of the echo, length how long the fish stayed in the cone.
What do the colors say?
Every unit colors a return by its strength. On the common palettes yellow is the strongest echo, red weaker, blue the weakest, and open water white or near black. Wired2Fish reads two flooded trees that way: the yellow blobs in the branches at 15–22 ft (4.6–6.7 m) are eight or nine fish. The trunks are barely drawn, because branches and fish stopped the sound first.
How much bottom does the cone see?
Lowrance’s own figures for a standard 83/200 kHz transducer are a cone of about 20° at 200 kHz (12° on the dual-search models) and 35–50° at 83 kHz. The rule of thumb that follows: at 200 kHz the circle of bottom you see is about a third of the depth across, at 83 kHz about the depth.
In 30 ft (9 m) of water the high-frequency beam looks at a circle 10 ft (3 m) wide. A fish 15 ft to the side of the boat does not exist on the screen. In less than 10 ft (3 m), Lowrance notes, the circle at 200 kHz is under 3 ft (0.9 m) across, so a fish has to be almost under the hull to be drawn. A wide cone buys coverage and costs detail; a narrow cone the reverse.
| Frequency | Cone or beam | Reach | What it draws |
|---|---|---|---|
| 50 kHz, traditional | The widest of the traditional cones | The deepest: Lowrance’s offshore and deep-lake setting | Coverage over detail; arches of fish close together merge |
| 83 kHz, traditional | 35–50°; the bottom circle about the depth across | Any inland lake | Bait schools and fish around the boat, with less separation |
| 200 kHz, traditional | Under 20°; the circle about a third of the depth | Shallow and mid-depth water; Garmin rates traditional sonar to 2,300 ft (701 m) at 77 kHz on a 500 W unit | Detail: separate arches, a fish a foot off the bottom |
| CHIRP | The cone of the band it sweeps; Lowrance’s bands are 28–51 kHz low, 85–155 medium, 140–250 high | As the band | Cleaner arches; two fish close together drawn as two |
| 455 kHz imaging | A slice: about 2° fore-and-aft by 50° across on Garmin’s GT52 | About 500 ft (150 m) down on the GT52; up to about 600 ft (183 m) a side on the best side-imaging units | The picture at longer reach: structure as it is, fish as dots with shadows |
| 800 kHz imaging | About 1° by 30° on the same transducer | About 500 ft (150 m) down; shorter to the side | The sharper picture: branches in a brush pile, a fish against a stump |
| 1.2 MHz imaging (Humminbird MEGA, Lowrance Active Imaging HD) | Thinner still | The shortest: a shallow and mid-depth tool | The sharpest picture: single fish inside a school |
The fish finders hub has the brand names each maker hangs on these frequencies, and the Garmin fish finder page sorts that maker’s units. The Humminbird and Lowrance pages do the same for theirs.
Free card: what 26 species do at your water temperature
Plus one email a week on what's biting now. No sales pitches. Privacy.
What do down and side imaging show?
Imaging sonar uses a very high frequency: 455 or 800 kHz, and 1.2 MHz on the newest transducers. Its beam is thin fore-and-aft and wide side-to-side, so each column of the screen is a slice, and the slices stack into something like a photograph. Down imaging covers about 60° straight under the boat; side imaging reaches out to several hundred feet each side. On imaging screens:
- Fish are dots or short dashes, not arches, because the beam is too thin for a fish to draw an arch through.
- Structure is drawn as it is: a brush pile looks like a brush pile, a drop-off like a cliff seen from above. Side imaging finds structure fast; 2D and down imaging show the fish on it once found.
- Hard bottom is bright, soft bottom is dark, the same rule as 2D.
- The water column on side imaging is the dark band next to the center line; anything in it is above the bottom.
The center line is the boat’s track. The newest slice is at the top, so you read down the screen the way you read back in time. The range figure is measured from the transducer at a slant, so the bottom you actually see to each side is roughly the range minus the depth. Wired2Fish works one example: a Lowrance screen set to 20 m a side in 3.9 m (13 ft) of water. Rounding the range to 60 ft and the depth to 14, the author puts the true bottom at about 46 ft (14 m) each side.
What do the shadows tell you?
A sonar shadow behaves like a shadow at sunset. The sound arrives from the side, so anything that stands up blocks it and leaves a dark patch beyond, and the longer the shadow, the taller the object. A fish on the bottom has its shadow attached. A fish off the bottom has a gap between it and its shadow that grows with height; that is FishTalk’s one-line test for sitting or swimming.
Fallen trees throw short shadows beside them, standing trees long ones away from the boat. A drop-off reads as a darker shade of bottom. Bluegill beds look, in Wired2Fish’s phrase, like a wad of truck tires: dark centers, bright rims.
How do you spot the thermocline and read the bottom?
In summer most lakes deeper than about 20 ft (6 m) split into a warm layer over a cold one. The thin band where the temperature drops fastest is the thermocline; the lake turnover page has the whole cycle. Sonar sees it because water density changes with temperature, and a sharp density change reflects a little of the pulse.
Two conditions have to hold. The temperature has to change enough, and quickly enough with depth, or nothing shows. And the sensitivity has to come up, because the return is weak. The band sits at one depth across the whole screen, with arches just above it and almost nothing below, where the oxygen has run out. When the band vanishes in fall the lake has turned over; the absence is as useful a reading as the presence.
The bottom line answers a different question: what is the lake made of here? Hard bottom returns most of the pulse, so the band is thick and in the hottest color. The echo is strong enough to bounce off the surface and the bottom again, drawing a fainter copy at twice the depth. Mud absorbs sound: a thin, cool-colored line with no twin. Idle along a bank with the range fixed, and the bottom line fattens and thins over gravel and silt.
Which settings make the screen readable?
- Turn off the fish symbols and read arches. Garmin’s menu offers symbols with “background information”, which keeps the raw return visible; the plain symbol hides it.
- Sensitivity (gain) decides how much of the weak echo is drawn. Garmin’s manual procedure works on every brand: raise the gain until noise appears in the open water, then back it off until it just clears.
- Range on Auto keeps the bottom in the lower third of the screen. Go manual over a sudden drop-off so the scale stops jumping and arches keep their size; Garmin’s manual says the same.
- Scroll speed matched to boat speed. Garmin recommends Auto for its ClearVü and SideVü views, which ties the scroll to speed over ground and keeps targets in proportion; Fast is the balance for 2D.
- Frequency: 200 kHz or the high CHIRP band for detail in under 100 ft (30 m); 83 kHz or low CHIRP for coverage or depth.
- Color palette: one with a clear hard-bottom color (the yellow-and-red palettes on most units), and learn it.
- Transducer angle: level with the boat at rest and at speed; a tilted transducer reads a false bottom and loses fish. The same goes for a kayak fish finder or a castable unit.
Five mistakes that cost fish
- Casting at a mark as if it were under the boat. On 2D sonar the right-hand edge is now; a mark mid-screen passed under you a while ago. The live A-scope strip at the right edge shows what is under you this second.
- Fish symbols on. Every suspended return becomes a fish, your own jig included.
- Gain too low, then trusting the empty screen. Bait and the thermocline go first. If a summer screen shows a clean bottom and nothing else, raise the gain before you move.
- Auto range over a drop-off. The scale rescales with every change of depth, so the same fish shrinks and grows. Fix the range a little deeper than the deepest water you will cross.
- Side-imaging range set without looking at the depth. Set 150 ft (46 m) a side in 10 ft (3 m) of water and every stump is a speck; bring the range down until the brush pile has branches.
When does forward-facing sonar win?
Everything above is history drawn one column at a time. Forward-facing sonar points the beam ahead of the boat and redraws the whole picture many times a second. A fish moves on the screen as it moves in the water, and your lure falls through the beam in view.
Wired2Fish reads a Garmin LiveScope screen this way. The transducer is the small zero at the top left; the forward range along the top reads 40 ft (12 m), the depth range down the side 30 ft (9 m). Water is black, bottom and cover green, brighter where the return is stronger. From those two scales the shot gives a school under the transducer and a brush pile just ahead, with a second school in front of it. The bottom rises from 26 to about 16 ft (7.9 to 4.9 m) 20 ft (6 m) out.
The three systems and the tournament rules that now limit them are on the forward facing sonar page. What the arches under your boat usually are depends on the water: the bass hub and catfish hub have the depths and structure each fish holds on by season.
Free download
The water temperature card
Read your water temperature and the card tells you who is spawning, who is feeding and what to throw. 26 species, 16 pages, for your phone and the tackle box.
Plus one email a week on what's biting now. No sales pitches. Privacy.
Related
Section guide
Fish Finders: How Sonar Works and Which Unit to BuyHow a fish finder reads the bottom: frequency, cone angle, CHIRP, down and side imaging and live sonar, plus the Garmin, Humminbird and Lowrance ladders.
 Best Fish Finder for the Money: What Each Price Step Buys
The best fish finder at each price from $120 to $3,000, what every step adds, and the Black Friday price to wait for on each pick.
Sources
- Lowrance, sonar and transducer basics
- Lowrance, transducer information
- Garmin, ECHOMAP UHD owner's manual: sonar models specifications (frequencies, depth rating)
- Garmin, STRIKER owner's manual: sonar gain
- Garmin, STRIKER owner's manual: setting the gain manually
- Garmin, STRIKER owner's manual: adjusting the range of the depth scale
- Garmin, STRIKER owner's manual: setting the scroll speed
- Garmin, STRIKER owner's manual: configuring the appearance of suspended targets (fish symbols)
- Humminbird support, seeing thermocline
- Defender Marine, Garmin GT52HW-TM transducer specifications (beam widths, depth)
- Sport Fishing Magazine, how imaging sonar helps you find fish
- FishTalk Magazine, sidescan fishfinders: living shadows
- CitiMarine, how to read a fish finder like a pro
- Wired2Fish (Shaye Baker), how to read a fish finder